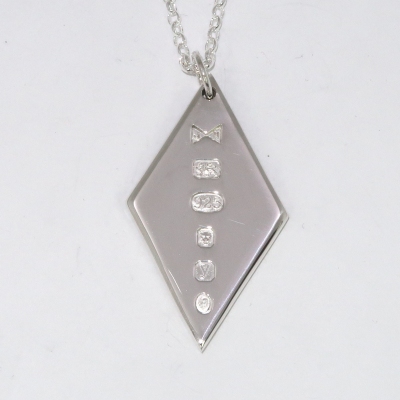
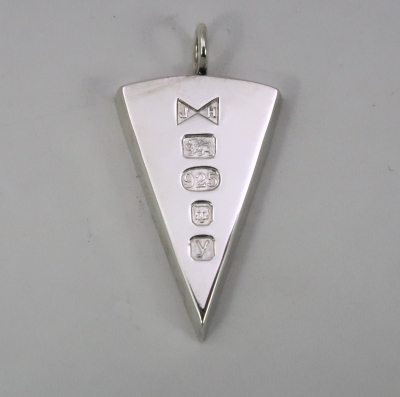
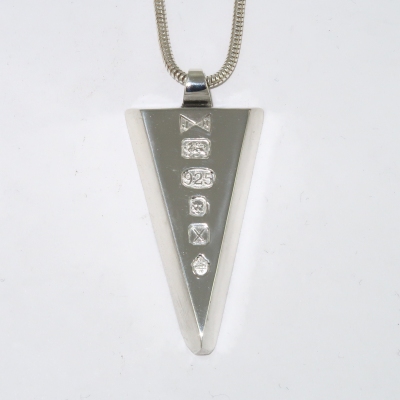
 I’ve made diamond shaped pendants before, but I was asked to make one this year with the coronation mark included. To give room for this, the pendant has to be significantly larger and weighing twice as much.
Double copper silver bracelet
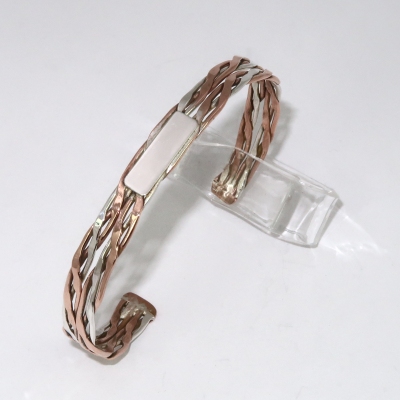 A variation on my popular copper/ silver twist bracelet – I was asked to make it wider. In discussion on the design, we decided to have two parallel bracelets with a silver plaque for the initials of the recipient. The bracelets are also connected by a bar at each end to keep the strands together. A more challenging task, but justified by the result.
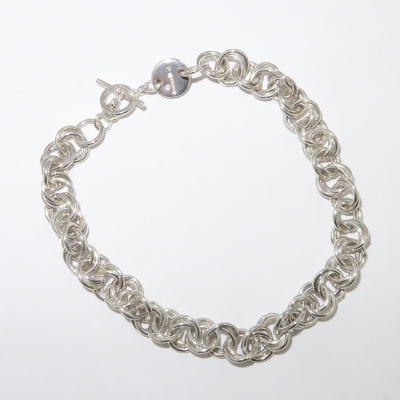
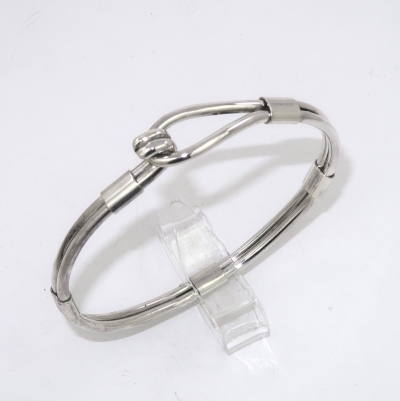
Twin wire heavy silver bracelet
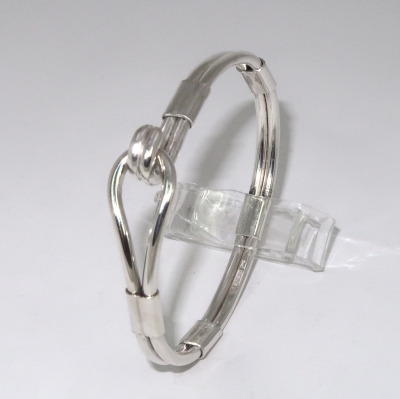 A singleton repeat of a pair that I made some time ago. Minimal soldering in this – just on the hook to make sure the two strands don’t get pulled apart. Otherwise, it’s held together by the tube. Below the plastic clips are the 2023 traditional marks and just below that, the coronation mark though it’s bearly visible in this image.
Silver twin ring earrings
One of the pair got lost, but I couldn’t think how I had made them – I don’t keep construction details.
I started from scratch and made these. The rings swing independently.

These are the same in concept as the previous pair, but the back ring has a different texture and they are slightly larger. More ‘statement’ than previously. I make larger, thicker versions for a pendant. These are thin to keep them light.
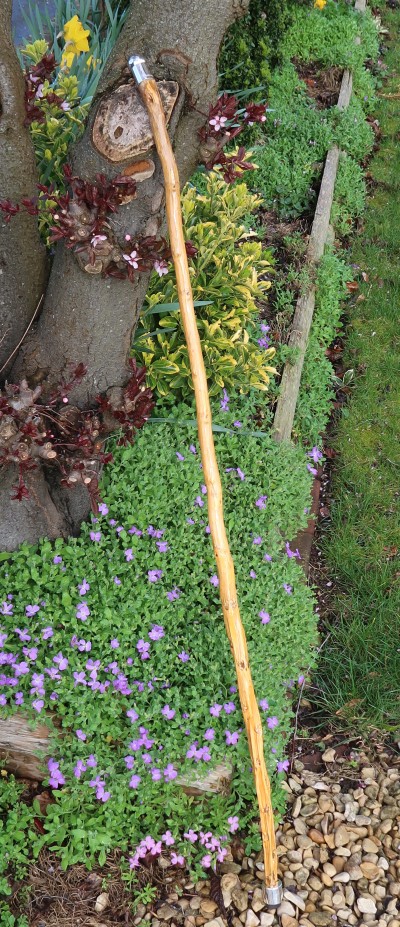
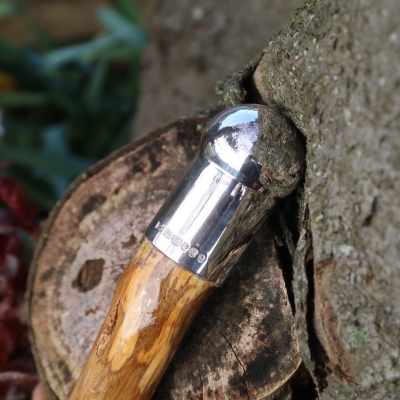
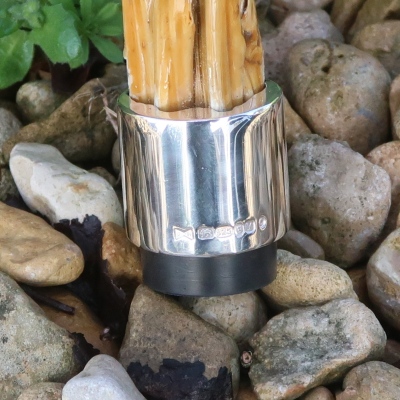
Jersey Kale – Walking stick cabbage silver cap and foot
Fascinated by the idea of walking stick cabbages or Jersey kale, I bought some seed and successfully grew a couple of stems. (They attracted cabbage white butterflies and their caterpillers like a magnet!). After carefully drying the stems, with my workshop smelling of cabbage for weeks, the stems are remarkable light and strong.
I’ve now varnished the stems and made a silver cap and foot cover, so a project of over two years is now complete. The foot is not a silver ferrule as there would be no grip. This way the rubber foot can be replaced easily and the stick is more practical. The silverware has full UK hallmarks including the Coronation mark. This one is mine, but I have a second stem if anyone is interested in commissioning me!
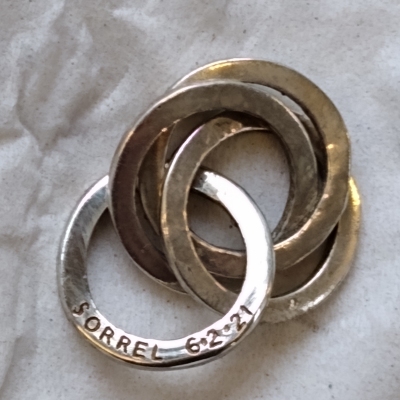
Birthing ring – third child
To celebrate the arrival of their third child, I was commissioned to make a birthing ring. This made from 9ct red, white and yellow gold wires. Making a virtually invisible join is tricky to get the continuity. At the back, you can just see my mark, the normal marks and the Coronation mark.
Matching a lost cufflink

The cufflink on the right lost its treasured partner. I managed to copy it using delft clay casting.
Whilst I would have preferred to smarten up the old cufflink and make them both bright and shiny, the owner enjoyed the somewhat battered character of the existing one. So I distressed the new one a little to make it similar.
Adding a grandchild’s name to a pendant
I didn’t actually make this pendant, but I do make something very, very similar. The gift was given when there were three grandchildren, but now there’s four!
To make it wearable again, I made a new silver ring to match and then arranged for it to be engraved in a similar font to the others.
New date letter Y for 2023
Every year from 1979 onwards, I’ve made an ingot and each one is different. This is 2023 – ‘Y’. Just one letter to go in the current cycle then in 2025, we start again. There’s more detail here.
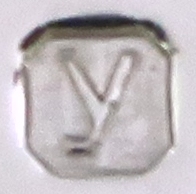 Here it is very much magnified and straining the autofocus on my camera.
I’m just wondering, as Charles III is being crowned this year, will there be an extra mark? History suggests there might be, but I’ve not heard yet.
UK coin cufflinks in silver mounts
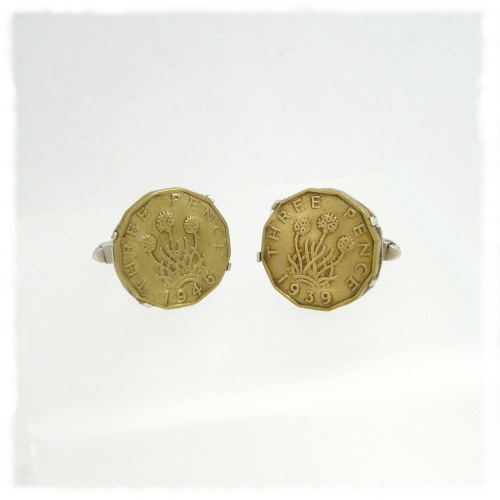
I have 3d – silver and cupronickel – cufflinks available in my shop here and elsewhere on that page. I now also have a range of six penny bits (tanners) available. 1949, 50, 51, 53, 54, 57, 58, 62, 63 and 1966. Apart from 1952, I could probably source other dates too. Please contact me.
Silver East German Ampelmännchen/ ampelmann
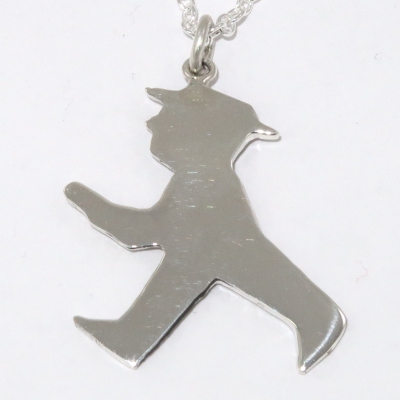 Those of you familiar with East German traffic lights will recognise this little feela. He’s only about 25mm tall intended as a silver necklet.
Silver scorpio pendant
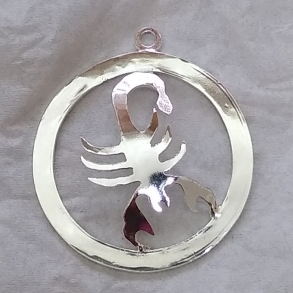
The crab motif is domed which gives a three dimensional effect. Other star signs are available.
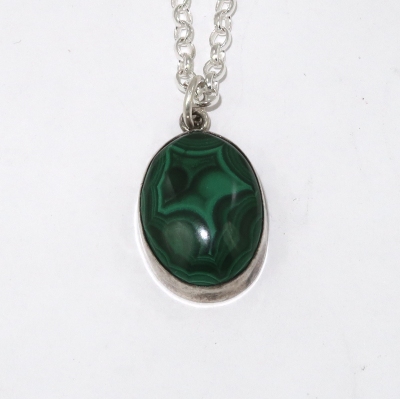
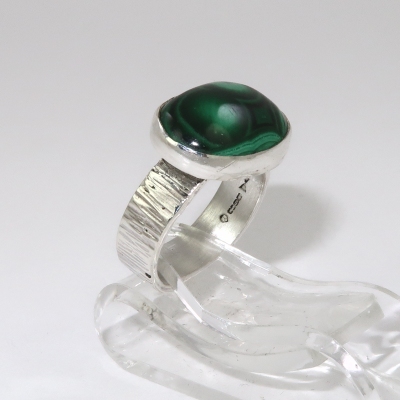
Repurposing malachite earrings
The earrings were no longer required, but the malchite cabochons were attractive and had sentimental value. One earring was easily converted to a pendant using the original bezel.
The other has been made into a cabochon ring with a textured shank
 You can see the mark of the Platinum Jubilee of the late Queen Elizabeth II at the end of the hallmarks.
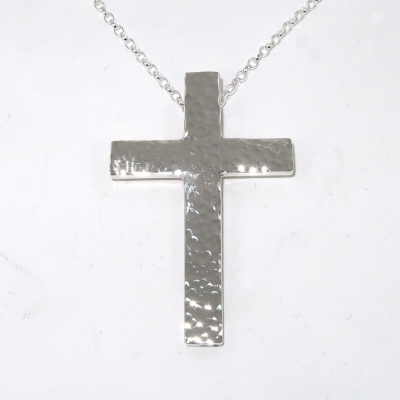
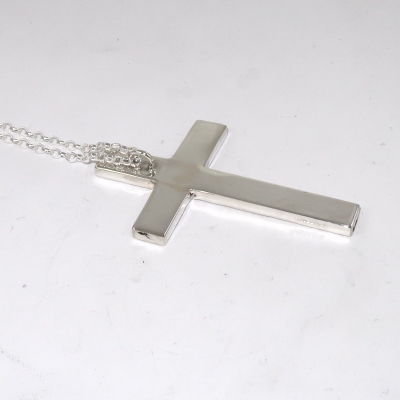
Textured surface silver cross
My client for this cross wanted a distressed surface on the outer face of the cross. Also that there was no visible loop for the chain from the front. The front face is bright polished, but the sides have a satin finish. The hallmarks are discretely placed on the side. The cross is 60 x 40mm.
Silver heart chain twin strand anklet
I couldn’t find a model for this.
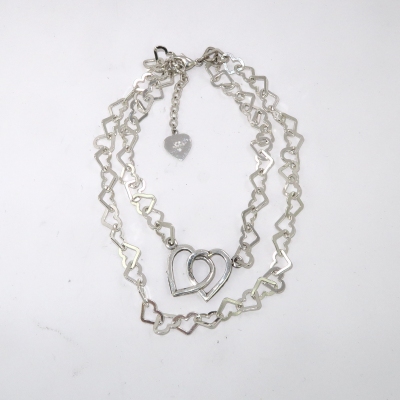
The inner loop sits above the outer loop on the ankle. There is a chain extender to suit different legs. The hallmarks are on the solid heart at the end of the extender chain. I ordered slightly more chain than I needed and so made a pair of dangly earrings to match the anklet.
Silver spoon stem repair
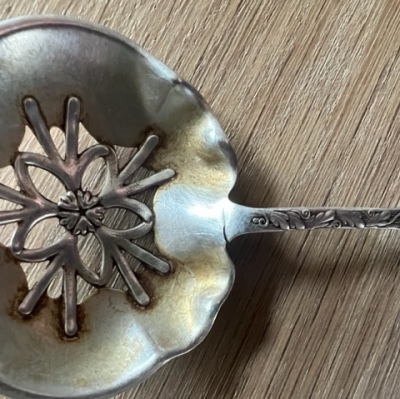
This well loved spoon was used for stirring and removal of a teabag, but unfortunately was showing signs of wear after many years of use.
I successfully soldered the crack closed and repolished it. It should be good for years to come.
(My thanks to the owner for permission to use his ‘before’ photo.)
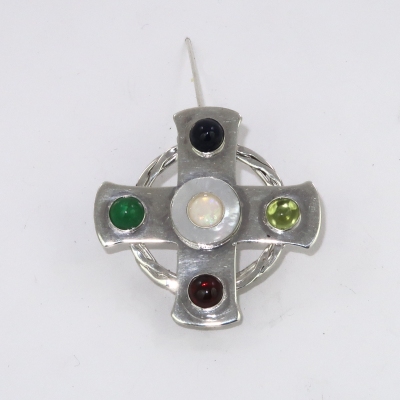
25th wedding present brooch
This brooch contains the birthstone of all four children and the parents.
Initial bracelet – albert style chain
This bracelet was modelled on a 80-100 year old design. The original has no solder joints at all. Mine has just a couple on the lugs.
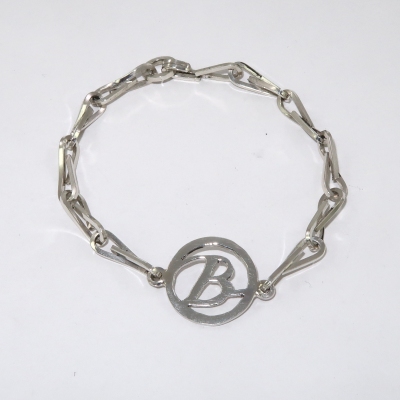
As the chain is solderless, it is easy to adjust the length.
Laser welder repair
My first real repair job using the welder.
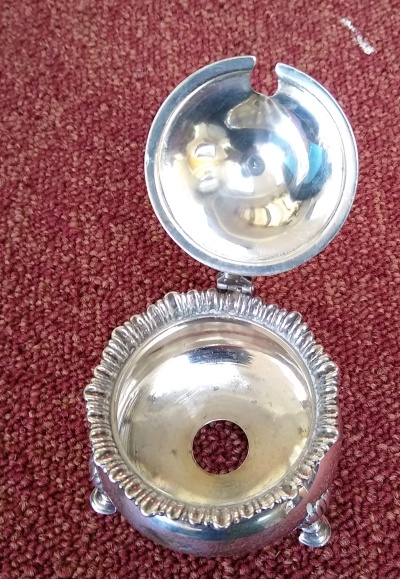
As you see it, the left knuckle of the base had come off and the right knuckle had broken. This was probably due to the lid being forced after the pin got gummed up.
I fixed the knuckles by laser welding them and made a new silver pin that was fitted in the normal manner.
I wouldn’t have attemped this repair without the laser welder.
I now have a laser welder
I’ve just bought a laser welder and am learning how to it to best effect. I’ve already used it for some jobs, but I’ve a way to go before I feel really comfortable with it. Like most things there’s a knack and you need to practice. I’m hoping this will make a major change to the repair tasks I can attempt and the work I can fabricate. Watch this space!
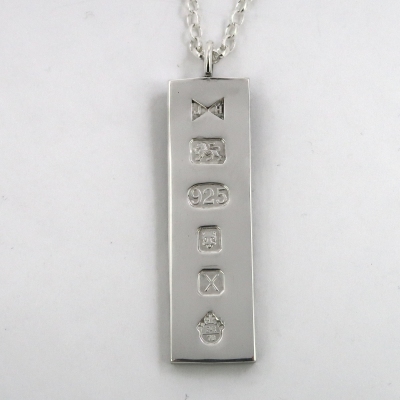
Silver Platinum Jubilee Ingots
 From the left, 1 & 3 are standard ingots, but 3 has the customer’s chain. No 2 is a wider and thicker ingot (~33g) with a snake chain. No 4 is a narrow ingot. All have been sent to their owners.
Saxon style wedding ring in silver and gold
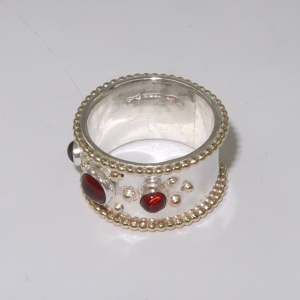 A complex design for me for a bride who wanted something different with an air of history. The gold and garnets suggests the Saxon era. In the lower picture you may just see the full marks for sterling silver and the part marks for 9ct gold. The groom reused his father’s wedding ring and I sized that for him too. This was the ring I mocked up in silver and is in this post.
Blue topaz silver ring
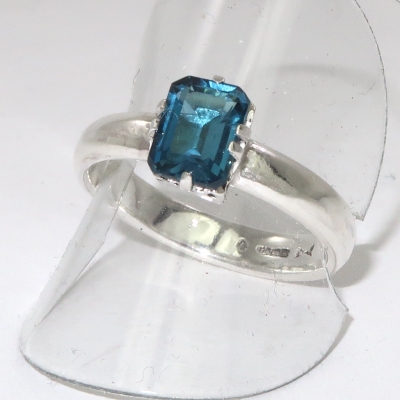 The stone is a beautiful London blue, 8 by 6mm topaz lozenge. I had hoped to buy a setting for the stone, but ended up making my own. Not my best skill, but eventually I made this setting from gallery strip. A good result that lets plenty of light to the stone. You can just see the Jubilee mark to the left of the main hallmark block.
Engraved silver bracelet
 This is an example of an engraved bracelet, but with the engraving on the inside leaving a bright shiny band on the outside. The hallmarks are on the outside though. I chose to have the London Assay Office’s staggered arrangement with three marks at each end – the sixth mark being the Platinum Jubilee mark. Allsport Trophies did the engraving for me on the flat strip.
Bitsa tube based silver earrings
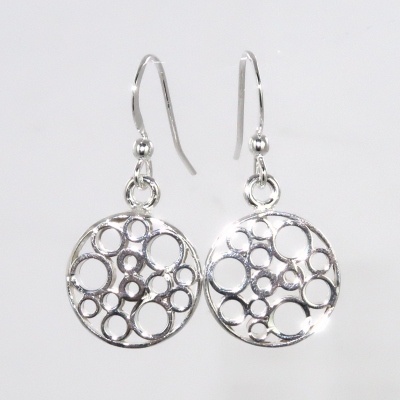 So called because they are made from ‘bits of” silver tube. Each weighs about 4g and they are 15mm in diameter.
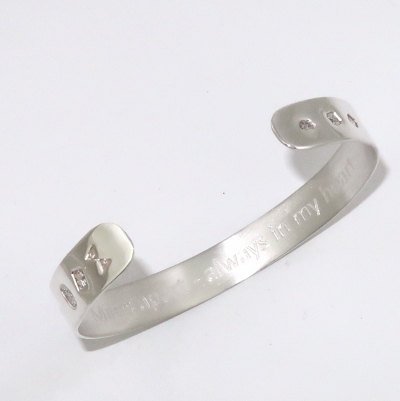
Silver band bracelet with memento
This bracelet incorporates an earring dropper as a memento of someone no longer with us. It also has an unusual arrangement of the hallmarks. They are position to ‘counterbalance’ the token and are six because they include the Platinum Jubilee mark. The arrangement is possible because the band is quite wide.
Silver crochet hook
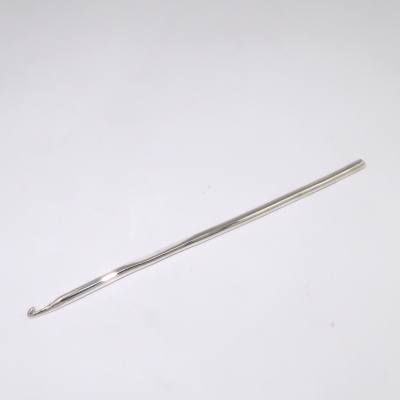
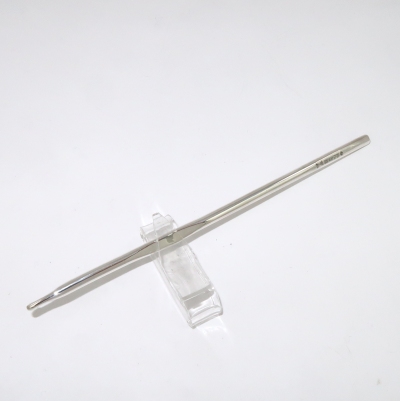
You can just see the hallmarks in the right hand image. It’s had a test drive and works well , though noticeably heavier than a normal crochet hook. This one is just about 4.5mm. I could make other sizes.
Unsolicited, the recipient of the gift emailed me to say
“I just wanted to let you know that I love it. It is heavier than a regular crochet hook but it’s a reassuring weight and has a lovely glide when you use it. “
Platinum Jubilee hallmarked silver ingots
Access to the Platinum Jubillee mark started in November 2021 and I have one 2021 ingot so marked. Here are three examples I have made for 2022.
The sloping triangle is a new design, whereas the other two correspond to those listed in my shop. I could also make the diamond version listed on the same page, though it would be much larger to gain the space for the extra mark. Please note that all 2022 ingots, with or without the optional additional mark, are only available to order. Please contact me for prices and delivery times.
Silver chain bracelet
Chains like this are great for refreshing your soldering skills.
 There are over 70 joints to be soldered and it’s only 18cm long. The silver disc is there only to provide a location for the hallmarks, which includes the Platinum Jubilee hallmark.
Silver bottle opener
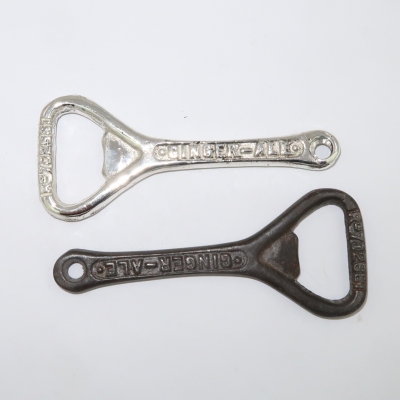
This casting was done using the delft clay technique. My first attempt using a casting frame I have just made. Some very minor imperfections but nothing to detract from the piece.
I wouldn’t use it to remove a bottle cap, the cap would mark and may possibly bend the silver. Silver is just not as strong as iron. The silver version is about 25% heavier too due to the difference in specific gravity. Available from my shop here. I can’t change the lettering, but I could remove it to create a space for engraving.
Star sign pendant – silver
This is just a test piece to try out the idea.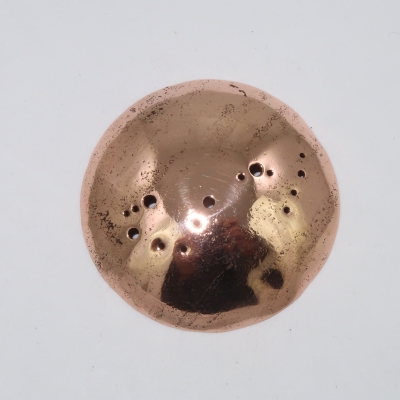
What you see is a domed disc of copper with the Scorpio constellation picked out with holes. The diameters very roughly correspond to the brightness of the stars. It was made using some copper scrap from an old water tank, which had some corrosion hence the tiny black dots. They wouldn’t be there in a silver version. It’s just under 45mm in diameter.
Another option would be to have silver or gold beads instead of the holes. Having the stars in yellow gold, except Antares in red gold, would give a nod to astronomy, though the colours may not be discernible at that size.
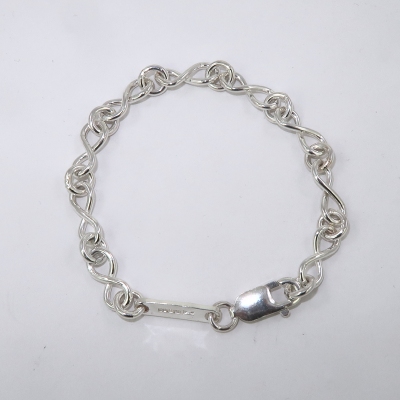
Heavy silver wire bracelet with clasp
A classic style, but this one is heavy duty with 3mm diameter wires and weiging 42g
Silver tapered ferrule with extension
Q. What do you do if the walking stick you have been given is too short?
A. Add an extended length ferrule.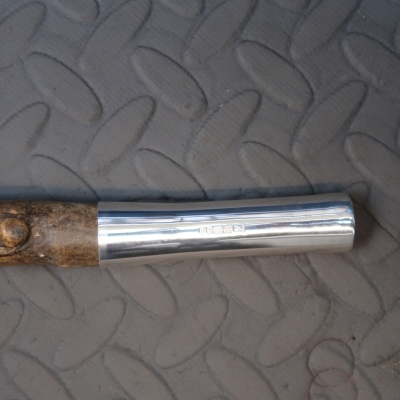 This added an additional 5cm to the stick making it much more comfortable.
Silver kinky boot tie pin
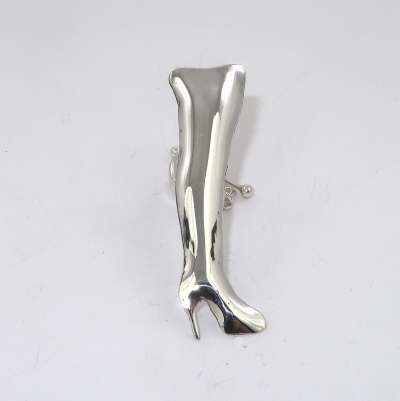 This tie pin is a Christmas present for the original inspiration behind the ‘Kinky Boots’ story, Steve Pateman.
It’s about 4cm tall, but a thin shell so quite light. The mirror image version is available for sale in my shop.
Silver holly leaf earrings
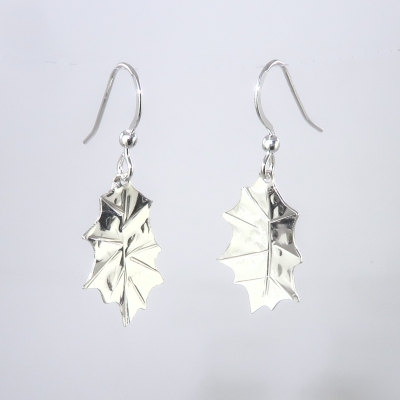
I’ve never been a great one for seasonal jewellery, but on a whim with some time to fill, I made these. About 20 by 15mm and very light, they catch the light nicely. Available from my shop. Other sizes can be made – also Christmas trees……
Crocodile tooth silver cap
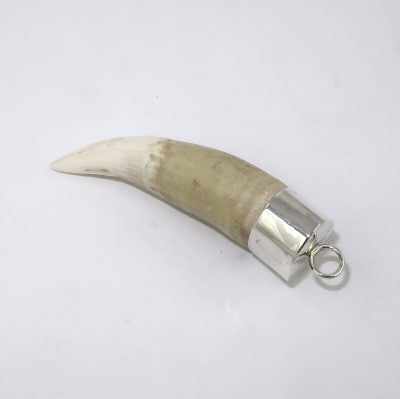
Having capped a hippo tooth and a warthog tusk, I’ve downsized to a crocodile tooth here. This one is only about 75mm long, but not something youwould want embedded in your leg! I’ve seen more wildlife teeth close up in this last year than ever in my life.
This is just waiting for a thong.
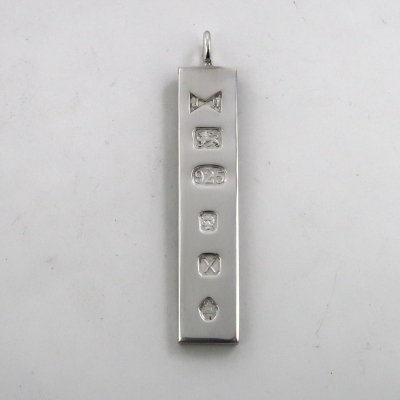
Bow tie and link silver bracelet
A recent bracelet – the style is bow tie and link – other styles are available. The bar at the bottom is only there as somewhere to place the hallmark.
Platinum Jubilee hallmarked silver ingot – 2021
From November 2021 until the end of 2022, an additional mark is available to mark Queen Elizabeth II’s Platinum Jubilee – 70 years on the throne.
Here is an ingot with the 2021 marks and a close up of the additional mark. For some reason the date letter is not available in 2021 with the Platinum Jubilee mark, but the arrangement shown below identifies the assay date to November or December 2021. That’s the most precise dating in my collection started in 1979. More detail.

Silver ring from earring
What to do with the earring you haven’t lost?
Sometimes I can make a near copy, but in this case the mosaic pattern was not reproducible. In the past I have converted the earring to a pendant, but, for this, I was asked to make a ring of it instead.
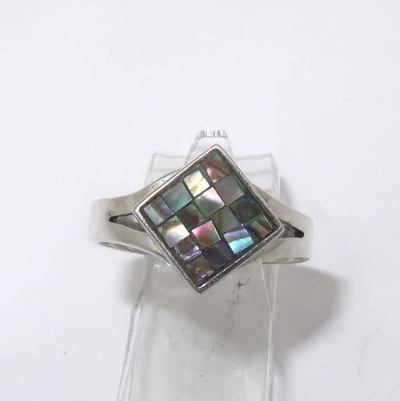 The earring is glued to a square base plate that fits the inside the back of the earring once the stud is removed.
Replacement amethyst ring
In 2015, I made an amethyst ring and pectoral cross for the Bishop of Hartford.
Unfortunately, with all the handwashing and slippy hand sanitser we all are having to use these days, the ring slipped off and couldn’t be found.
Fortunately, I had all the details and rapidly made an ‘identical’ replacement.
Another special opal pendant
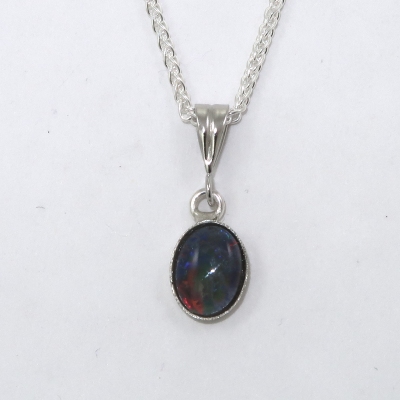 This opal triplet was recovered from a piece of costume jewellery and has been reset to match an existing pair of earrings.
Silver mount for special opal
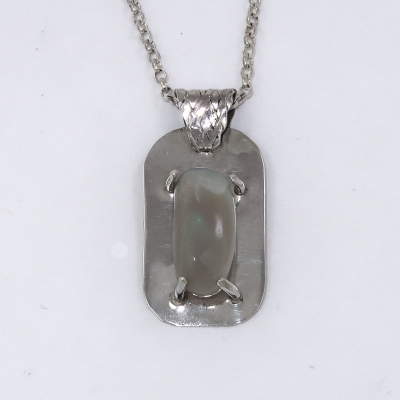 This opal has special memories and the owner polished it from rough. The brief was to show the opal off to its best. The back side has no special interest, but the sides and top show the opalescence. Hence the minimalist use of claws. The reflections from the silver enhance stone.
(The opal wasn’t completely set tight at this point, but was before delivery.)
Walking stick with silver collar
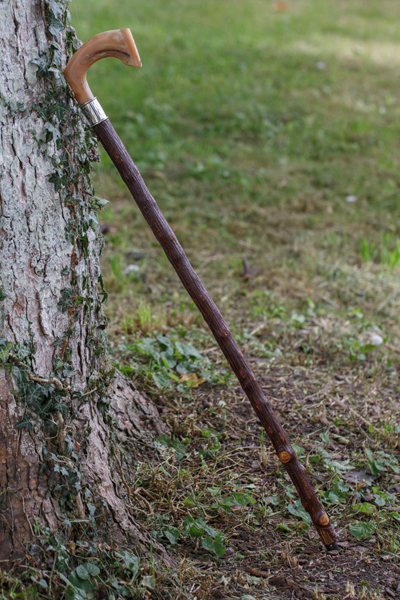 Earlier this year, Mark Lord approached me to make a heavy duty silver collar for a special stick he was making for a friend. Here is my collar on the finished stick. I supplied the collar bright polished and Mark had the collar engraved. Mark’s website is lordscountrysticks.com if you are looking for a unique stick. If you just want a collar or ferrule, then contact me.
Custom silver olive picks
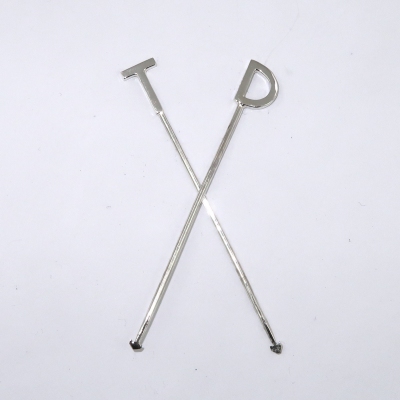
A must-have accessory for your bar/ pub at home – personalised silver olive picks.
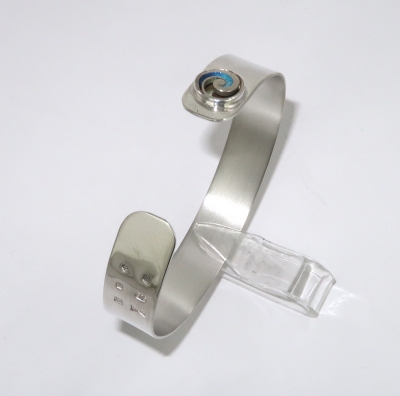
Silver split bangle
I think this counts as a bangle rather than a bracelet because it is effectively solid all the way around. At the top, you can just see then pin that located the two sides into one of two holes to give some adjustment. There is a slight twist on the two sides to give some tension to hold the pin in place. At the bottom, you can see the hallmarks either side of the hinge – six for symmetry so I had to get the common control mark added at small extra cost. The bangle is made from solid wire so it weighs about 50g – a nice solid piece of jewellery.
Silver ring result of 1:1 teaching
 This ring is the result of some 1:1 teaching that I have recently provided over a couple of sessions. There’s a lot to learn from this relatively simple exercise.
- selection of metal – sterling &/or fine
- soldering – hard , medium and easy all used
- twisting of wire
- rolling of wire
- use of the piercing saw
- work hardening
- firescale
- sizing
- polishing
- stone selection – shapes and types
- stone setting/ burnishing
- milligrain wheels
- assay requirements
Plenty to talk about – maybe too much to remember. Repetition helps.
Begbroke bear silver pendant
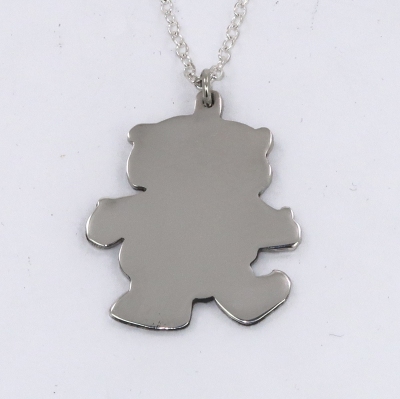
This is a silhouette of the logo of the Begbroke preschool as a pendant. It was a retirement present for one of the staff. A rush job, but fortunately below the minimum weight for hallmarking and so just stamped with my mark and ‘925’.
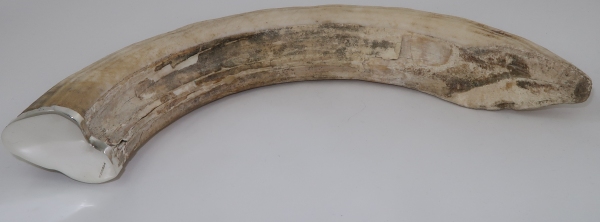
Hippo tooth silverware
Not content with a cap for a warthog tusk, I’ve added a hippo tooth cap to my list of unusual jobs.
This was the tooth as supplied – much bigger and heavier than I expected.

To make the cap fit, I had to cut off the area where it broke off. My workshop smelt like a bad day at the dentist! However, the debris looked interesting. Here’s the tooth with its hallmarked silver cap.
I decided to make a pair of cufflinks with some of the debris.
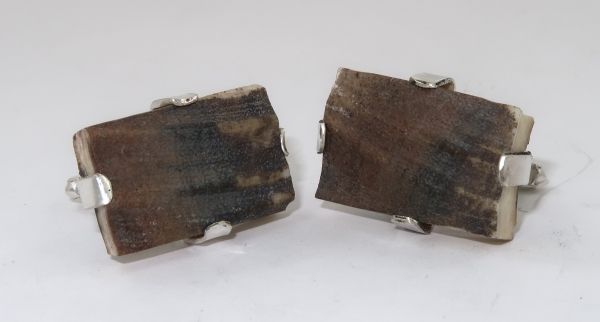
The owner of the tusk and cufflinks is very happy with my work.
Common Control Mark
This is a first for me – I’ve never had work with the Common Control Mark applied. This means that the quality of the metal would be recognised by twenty countries.
Though to be honest, I have a couple of pieces where six hallmarks looks better than five.
This is one – the other is here.
More detail on the CCM here.
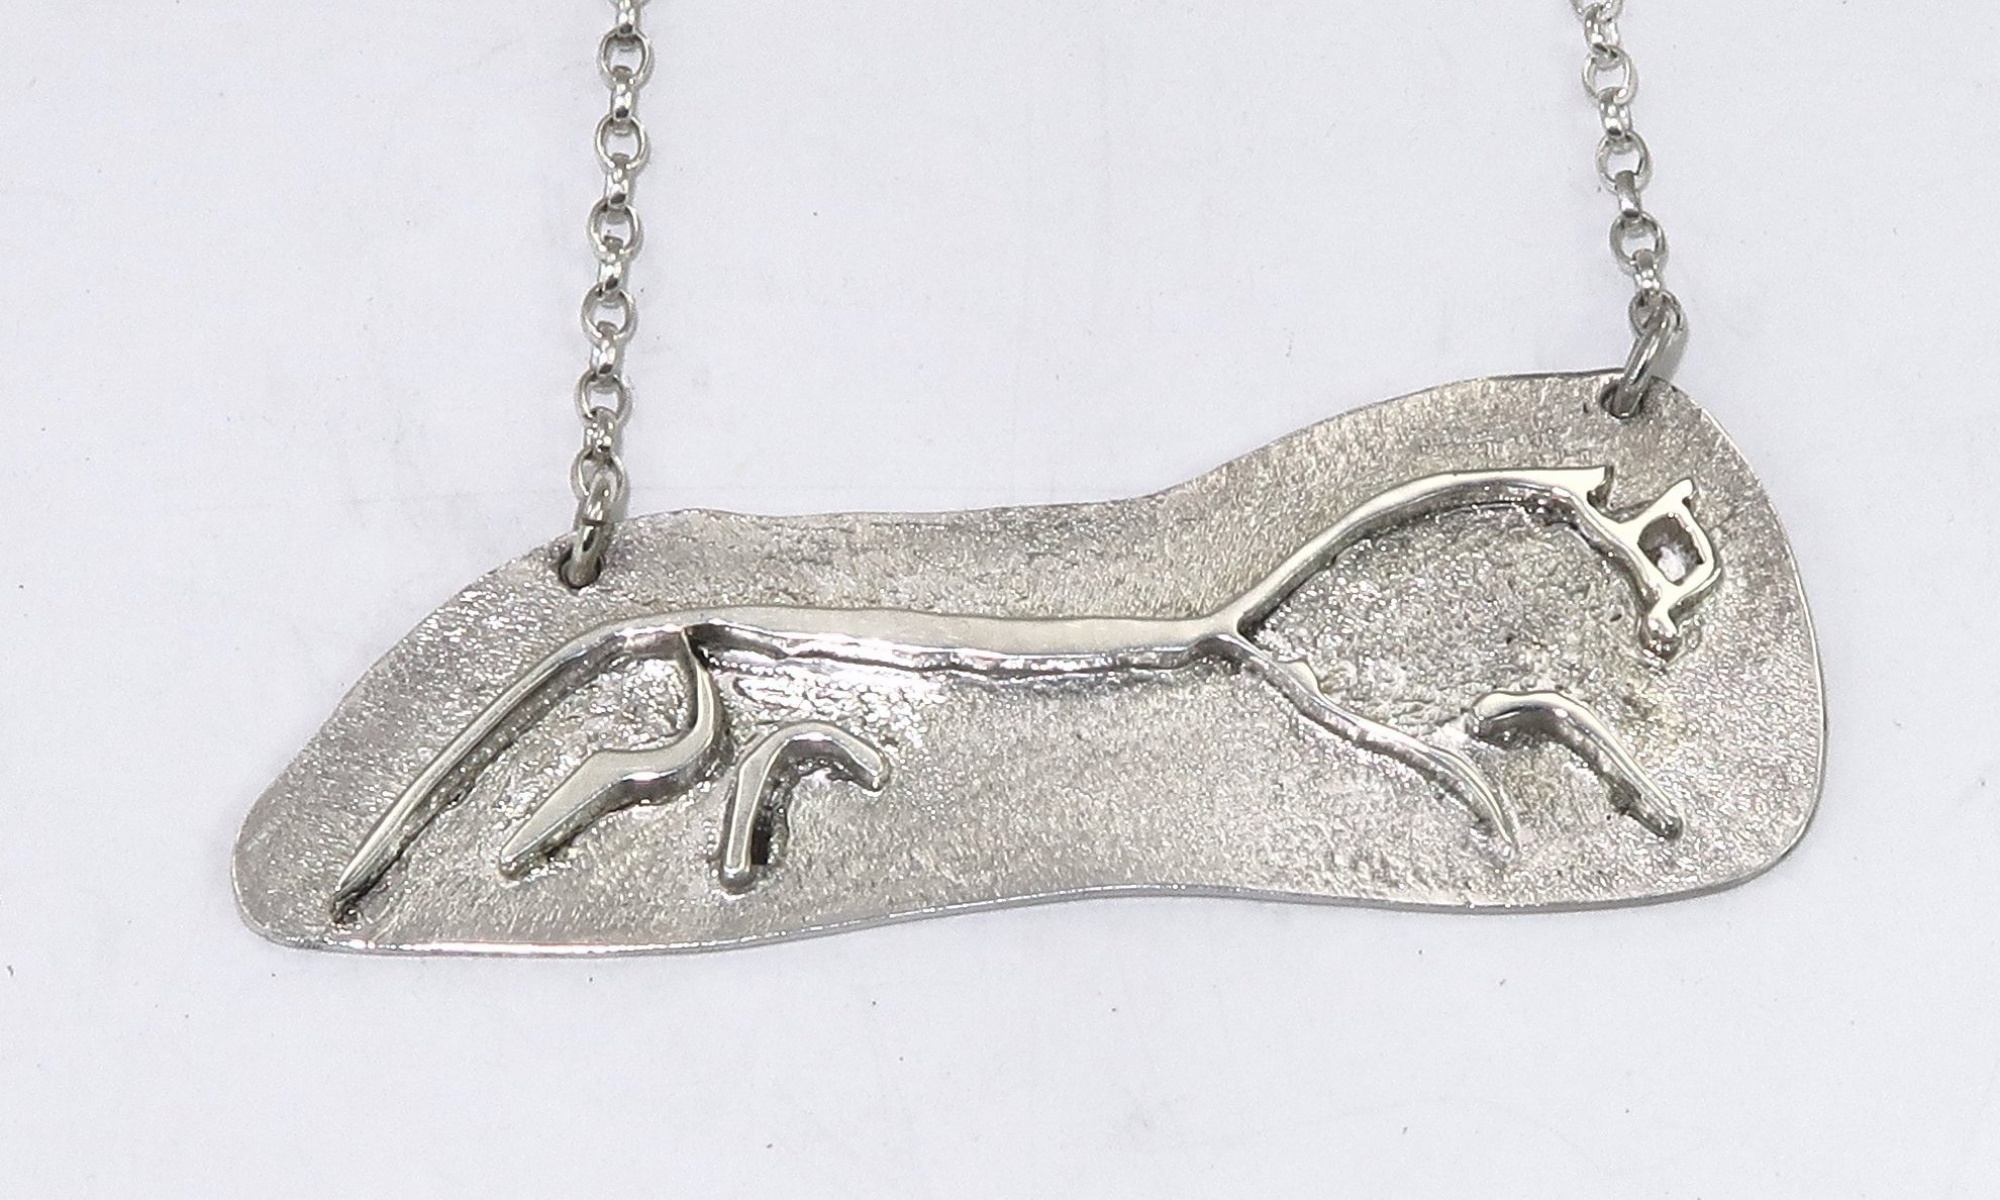
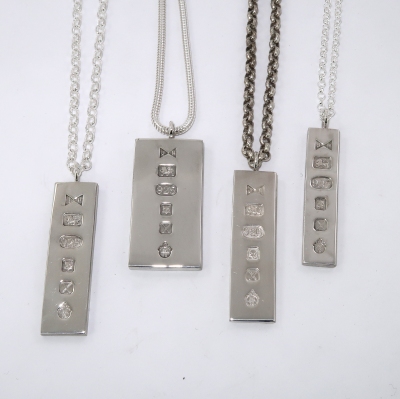
Bespoke symbolic silver pendant
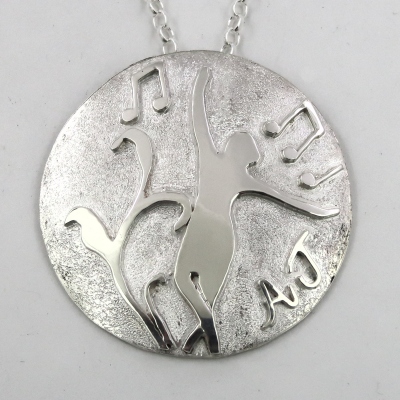
I won’t tell you who AJ is, but this pendant was designed and comissioned by her relations as a special birthday gift and I realised the design in silver. ‘ AJ’ will understand the story it tells.
The disc is about 50mm in diameter and involved fifteen solder joints and some very careful sawing!